Beginners' Guide: How to Navigate the Webflow Designer

The Webflow Designer is a no-code web design tool that lets you create websites visually without writing code. It has a user-friendly interface that consists of several panels and toolbars that give you access to different features and settings.
The Main Panels
The main panels are located on either side of your screen. They are:
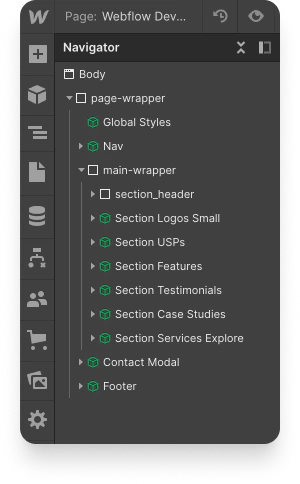
- The Navigator panel: This panel shows you the structure of your website as a tree of elements. You can select, reorder, rename, duplicate, delete, or hide any element from here. You can also drag and drop new elements from the Add panel into your Navigator panel.
- The Add panel: This panel lets you add new elements to your website, such as headings, images, buttons, forms, etc. You can drag and drop any element from here onto your canvas or into your Navigator panel.
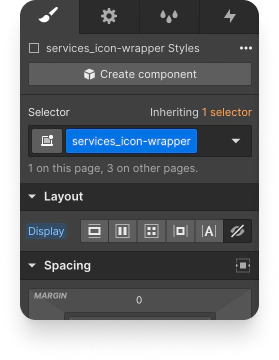
- The Style panel: This panel lets you style any element on your website using CSS properties such as color, font, size, position, layout, etc. You can also create classes and combo classes to apply styles to multiple elements at once.
- The Settings panel: This panel lets you adjust various settings for each element on your website, such as ID, class name, SEO attributes (title tag), custom attributes (data attributes), etc.
The Toolbars
The toolbars are located at the top and bottom of your screen. They are:
- The Top toolbar: This toolbar lets you switch between different breakpoints (device sizes) to preview how your website will look on different screens. You can also toggle between desktop view and mobile view using this toolbar.
- The Bottom toolbar: This toolbar lets you know where the selected element is within the existing HTML structure of the page.
How to Find Hidden Elements
Sometimes you may want to hide some elements on your website for various reasons. For example:
- You may want to hide some elements on certain breakpoints (device sizes) to optimize your layout for different screens
- You may want to hide some elements temporarily while working on other parts of your website
- You may want to hide some elements that are only used for interactions or CMS purposes
There are two main ways to hide elements in Webflow:
- Using display settings
- Using overflow settings
Using Display Settings
You can use display settings to control whether an element is visible or not on your website. To do this:
- Select an element on your canvas or in your Navigator panel
- Open Style panel > Layout > Display
- Choose one of the display options:
- Block: Makes the element visible as a block-level element
- Inline-block: Makes the element visible as an inline-level element
- Inline: Makes the element visible as an inline-level element without any margin or padding
- Flex: Makes the element visible as a flex container that can align its children horizontally or vertically
- Grid: Makes the element visible as a grid container that can arrange its children in rows and columns
- None: Hides the element completely from your website
You can also use combo classes to apply different display settings for different breakpoints.
To find hidden elements using display settings:
- Switch between different breakpoints using the Top toolbar
- Look for any elements that have display:none applied in their Style panel > Layout > Display section
- To make them visible again:
- Remove display:none by clicking on it again
- Or change it back to another display option such as block or flex
Using Overflow Settings
You can use overflow settings to control whether an element’s content is clipped or not when it spills outside its parent’s boundary.
To do this:
- Select an element’s parent on your canvas or in your Navigator panel
- Open Style panel > Size > Overflow
- Choose one of the overflow options:
- Visible: Shows all content even if it spills outside its parent’s boundary
- Hidden: Hides any content that spills outside its parent’s boundary
- Scroll: Adds scroll bars if content spills outside its parent's boundary
We recommend creating a backup of your project before making signficant changes to the styling of Webflow elements, especially across breakpoints.
For more guides, tips and tricks on how to get the most out of Webflow sign up to our free newsletter.

Get the best news, recommendations and guides straight from the lab.